Getting Started Guide
Document version: 1.0
Author(s): Sven Gijsen
Date: July 2015
Introduction
The purpose of this document is to show you the basic features of BrainStim in a tutorial way.
The best way working through this document is starting from the beginning and follow all tutorials
till the end of the document, you could also only follow a single specific
topic of your interest but then please bear
in mind that some topics expect you to already
have some knowledge of previous topics.
This Getting Started guide mainly covers the basic usage of
BrainStim and it's features, most user plan to use BrainStim
for creating and running their behavioral, psychological and
physiological experiments but because these features are
beyond the basic BrainStim features these are described in
the Creating Experiments with the Experiment Manager guide.
Please be aware that this guide may expect you to read the
below Getting Started Guide first.
This Getting started guide is
not perfect and continuously under construction, so we would be happy to receive feedback about bugs, typos, comments,
new ideas.
Installation
Installing BrainStim on your computer is easy, you can download the latest release from the GitHub project site. The public BrainStim source code repository is also hosted here. You can choose between a 32 and 64-bit version of BrainStim depending on the Windows operating system type you're using. You can use the previous link as a guidance for checking this configuration or alternatively you can execute the following Command Prompt command (a Command prompt can be opened using the: Windows start button --> Run... --> enter the text cmd --> hit the enter key):
|
If it echoes with x86 then you're working on a 32-bit architecture, if not then it's an 64-bit architecture.
BrainStim strongly depends on the OpenGL 2.0 (or higher) graphics library, so for an optimal usage please make sure that your graphics card supports OpenGL 2.0 (or higher) and that the drivers for this graphics card are up to date. When installing BrainStim you should try to do this using administrator privileges. There are also some virus scanners which trigger a false virus detection due to the automatic installation of various (network) libraries. If you should receive a detection message like this, you could consider deactivating the real-time virus detection while installing BrainStim.
The BrainStim release download is compressed inside a zip file and should first be extracted, after that you can execute the BrainStim installer. Please read about the first time start of BrainStim and the Update Manager Tool
BrainStim Directories
Main Program directory
The BrainStim installer copies the program files to the default Main Program directory (default: C:\Program Files (x86)\BrainStim), during installation the location for this directory can be customized. Inside this directory you can find the BrainStim.exe executable file that you can use to execute the BrainStim program. Some sub-directories found in this directory are:
| Directory | Description |
|---|---|
| Apis | The files inside this directory are used for supporting the BrainStim document editing, like call tips and auto completion. Each API (Application Program Interface) defines the way to handle a specific programming language. |
| Documents | This directory contains all the necessary files for the BrainStim Help. |
| Include | The default include directory used for script files when using the "Include()" script function. |
| Menus | This directory can contain some custom menu definition files that define some custom Menu Bar commands, read this document for more information regarding this topic. |
| Plugins | This is the root directory in which BrainStim searches for default plug-ins to load during startup, if compatible then they are automatically embedded in BrainStim and are then ready for usage. |
| Qml/plugins/[architecture] | This is the root directory in which BrainStim searches for QML plug-ins to include during the startup of the QML viewer. |
| Updates | This directory can contain some updates that are placed here by the installer. The first time a user starts BrainStim he or she is asked whether these available updates can be installed. |
| Xsd | This directory contains XML Schema (*.xsd) files, which let BrainStim validate experiment (*.exml) files. It is used to express a set of rules to which an experiment must conform in order to be considered 'valid' according to that schema. |
BrainStim makes use of two additional directories, these directories are created and used after the first start of BrainStim, these are:
Main User directory
Depending on the windows login username and BrainStim version the path is:
C:\Users\<login username>\BrainStim(vx.x.x.x, xx-bits)
This directory is mainly used for user specific dynamic data access(read/write) and is empty (or perhaps not present) before the first start of BrainStim. Inside this directory you can find the following sub-directories/files:
| File/Directory | Description |
|---|---|
| Examples | This directory contains various example and tutorial files, some of them are also referred to by this document (see the sub-directory BrainStim\examples\GettingStartedGuide\). These files can be viewed/executed by a user and provide information about a certain topic of a feature or functionality. |
| Examples\Plugins | This directory contains the example and tutorial files for installed custom plugins. |
| Outputs | This directory is used when needed by BrainStim for saving logfiles that are generated during the execution of an experiment. |
| Temp | This directory is used by BrainStim for storage of temporarily files. |
| logfile.txt | This logfile is used by BrainStim for logging all main program execution information, warnings and errors. See this document for more information. |
| BrainStim.ini | This file is used by BrainStim for storing and retrieving all internal settings/configurations. |
You can change this directory using the BrainStim Settings Dialog. Important! Although the BrainStim Settings File (BrainStim.ini) is located inside this directory by default the location of this file doesn't change by changing this setting, for all the remaining directories and files it does.
Custom Plugin directory
Depending on the windows login username and BrainStim version it's located at:
C:\Users\<login username>\AppData\Local\MBIC\BrainStim\BrainStim(vx.x.x.x, xx-bits)\Plugins\<architecture>\
This directory is used for the installation of user specific custom Plugin and additional files that are needed for this plugin.
You can change this directory using the BrainStim Settings Dialog. Important! After changing this setting you should copy all needed Plugin files from the "old" directory setting to this "new" directory setting for the plugin(s) that you still want to make use of in BrainStim.
User Interface
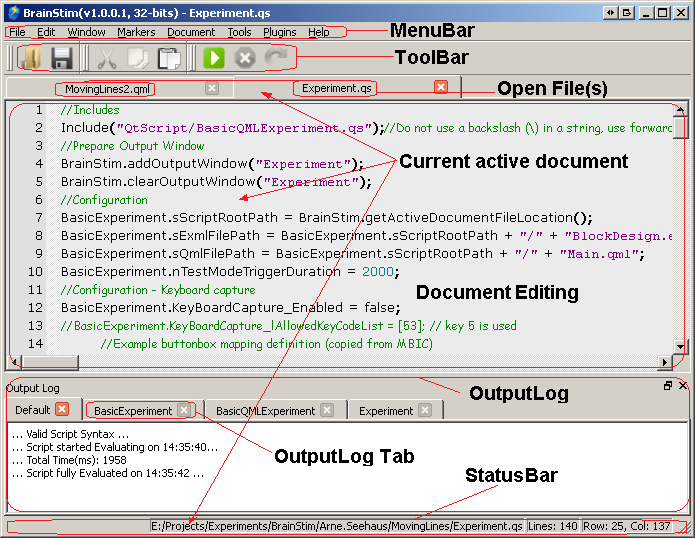
The default BrainStim User interface contains a MenuBar, ToolBar, Document Editing, OutputLog and StatusBar area. These area's can be resized and moved around by a user and these customization are then automatically saved by file type extension of the current active document. Read this document for more information about the default User-Interface. Furthermore (custom) plugins may also define custom editing area's for different file type editing purposes, read this document for more information about that topic.
Menu Bar
The default menu bar includes the following menu's:
| File/Directory | Description |
|---|---|
| File | contains commands for various file operations like opening, saving and printing files. |
| Edit | contains commands for the editing of files and search/replace features. Furthermore there are some additional commands for controlling the Output Log tab(s). |
| Window | contains commands for organizing, selecting and viewing one or more document(s). |
| Markers | contains commands for the management of markers that can be used to mark or quickly jump to one or more specific position(s) in a loaded document. |
| Document | contains commands for controlling the execution of various documents like script (*.qs) files. |
| Tools | contains an option command that lets you configure the BrainStim settings. |
| Plugins | contains commands for the loaded/embedded plug-ins in BrainStim. With these commands you can open the plug-in's User Interface. Plug-ins are automatic divided in Extension and Device plug-ins. You can also open the Plugin Managers dialog from this menu. |
| Help | contains commands for opening the BrainStim help and viewing release information about BrainStim. |
The default menu bar can be extended by implementing one or more menu configuration files, read this document for more information about this topic.
Configuration and Settings
BrainStim Settings file
BrainStim makes use of a configuration file to store all settings/configurations. This configuration file, named BrainStim.ini is located in the Main Program Directory, because this directory is different per Windows login user the settings are stored separately. The settings file is also used by BrainStim for storing custom layout settings of the different UI areas.
BrainStim Settings dialog
You can open the settings dialog from BrainStim by selecting the menu commands: Tools - Options. Read more about this topic in this document.
Command-line switches
BrainStim can be started from the command prompt with special defined switches accompanied with one or more parameter(s). Read more about this topic in this document.
Editing and Scripting
At first glance BrainStim features various text editing tools that are found in standard text editing applications, like for example notepad. BrainStim allows to open and edit multiple documents simultaneously. The user interface of BrainStim may completely change depending of the document type (which is automatically resolved by the document extension) which makes BrainStim very flexible for editing various file types, read this document for more information about this topic.
Exercises - Editing
The BrainStim User Interface
- We can see that BrainStim automatically adds a line number in front of the text lines. In the right lower corner we can also see the total number of lines and some information about the cursor position inside the document.
- It's possible to open and edit multiple files simultaneously, let's try this by opening another file, open the file (<BrainStim directory>\Examples\BrainStim\QtScript UserInterfaces\AnalogClock.qs) by using the shortcut key combination CTRL + o and then browsing and selecting the file.
- This file has the extension (*.qs) and is known and detected as a BrainStim script file. Although the document contains no text styling formatting information (only textual), the document is shown in the new document with a special styling formatting. This is automatically done by the internal document editor because it already knows how to handle this type of file.
- If we open the Window menu we can see the two opened documents, you can switch between them pressing the Ctrl + TAB shortcut key combination or maybe by selecting one from the Window menu. Furthermore if you choose the Tile option the two documents are automatically tiled, alternatively you can move and resize them.
- Recently opened documents (the last 8 previously opened document(s)) can be quickly reopened using the File menu and then selecting the appropriate document, try this after having closed the opened documents.
- Standard Find and Replace options are available from the Edit menu. Maybe you want to try these options to find out how they work.
- The Markers menu contains several commands for accessing the markers features used for quick navigation inside a document. After you have opened a document you can click with your mouse on a line number of a document to create or remove a marker or alternatively use the Add/Remove marker command from the Markers menu. Make the cursor jump to a specific marker by using the next/previous marker commands. Try the Markers menu commands to find out about how to use the quick navigation marker features.
- The Document menu contains commands for handling the execution of documents by an internal engine, this is explained later.
- The Tools menu contains commands for the configuration of BrainStim.
- The Help menu contains commands for accessing all kind of versioning information about BrainStim and it's loaded plug-ins. Another important feature is the Help Contents command (or use the F1 key) that opens a viewer for the BrainStim Help collection. This Help collection contains extensive information about BrainStim, the available plug-ins, a complete script reference and off course this Getting started guide.
- Another UI component is the Output Log pane on default in the lower part (you can move and resize this pane) of the BrainStim window. We'll see that this Output Log pane is very useful for testing and debugging scripts. Some commands for this pane are available if you right-click with your mouse onto it or by opening the Edit --> Output Log Pane menu.
Exercises - Scripting
Although the below scripting exercises a pretty easy to understand for a general programmer, they do expect you to have already gained some knowledge about scripting and basic programming.
Hello World script
Let's first try to open/view and execute a very basic script with BrainStim
- Start BrainStim
- Open the file (File -> Open... or use the Ctrl + o key combination) HelloWorld.qs found in the directory BrainStim\examples\GettingStartedGuide\BasicScripting\.
You can see again that the plain text is automatically highlighted/styled according to the syntax it contains. Text/code can be commented using the single line comment ?//? or the multi-line ?/*? and ?*/? combination, commented text is not executed by the internal script engine but can be used for the documentation of script code for a better understanding. In the script three variables are declared (using the var statement) and a value is assigned to them, the third variable is assigned to the calculated sum of the first two variables. The value of this third variable is then used in a special function called Log() that appends the provided string parameter to the BrainStim Output Log pane. To clear the Output Log pane right-click on it and select Clear All Output Item(s). Some times you might want to copy some text from the output log pane, you can do this by selecting the text to copy to the clipboard and then right-click on it and select Copy Selected Text. Alternatively you can also use the default operating systems Copy/Paste commands.
- Execute the QtScript code (done by the internal BrainStim script engine) by using the F5 key or by the menu Document -> Execute command.
The QtScript code of the current active document is then evaluated and executed. You can see in the Output Log pane when the script started/stopped evaluation and how many time it took to evaluate. We can also see that for each Log() function call there's one additional line appended to the Log Output pane.
Functions and includes
Within the BrainStim script (QtScript) you can define functions and includes that allow you to structure this script in a more modular way read more about this topic in this document.
Additional BrainStim Functions
In a previous exercise we already made use of the additional Log() function to write text to the log output pane which can be very useful for debugging purpose. This Log() function is made available in the script environment by the BrainStim application to provide a convenient way for the user to easily output information from the running script to the main BrainStim User Interface. There are more additional convenient functions made available to the script environment by the BrainStim application, as you can see in the following example.
- Start BrainStim.
- Open the file AdditionalBrainStimFunctions.qs found in the directory BrainStim\examples\GettingStartedGuide\BasicScripting\.
- Execute the QtScript code.
- Take a look at the script and make sure that it makes sense to you.
When we look at the script code we see that it uses some additional functions prepended with the ?BrainStim? namespace (followed/separated by a dot) because these used functions belong to the BrainStim main program. We see some functions that can retrieve absolute directory paths, environment information etc, but also some functions that perform BrainStim UI functionality like find() and closeSelectedScriptFile(). All available additional BrainStim script functions are described in the BrainStim Main Application Scripting Reference.
The Log() function is actually the same as the BrainStim.write2OutputWindow() function (internally it does exactly the same) but because this functionality it's so commonly used and the BrainStim.write2OutputWindow() function takes a lot of characters(key presses) and time to code that it has been made available to the script engine under the short Log() function signature.
Dynamic Object construction and Garbage Collection
The internal BrainStim script engine uses a garbage collection method to reclaim memory used by the script objects when they are no longer needed. Because this is important it's a good programming practice to follow some guidelines to make sure this can happen, read this document for more information about this topic.
Qt Library Script Bindings
To further extend the script engine functionality BrainStim has a feature that automatically detects and integrates (pre-generated) Qt bindings for the Qt Script environment. With these bindings you get access to substantial portions of the Qt API from within Qt Script. Read this document for more information about this topic.
The Signal/Slots mechanism
The BrainStim script engine supports Qt-style signal and slot connections, that can make the script very powerful, see this document for more information regarding this topic.
BrainStim Plug-in Script Bindings
BrainStim has the ability to automatically integrate (load and embed) plug-ins that extend the functionality of BrainStim (see the plug-in reference for a list of available plug-ins). These plug-ins can expose their functionality to the BrainStim Script engine, allowing the user to take advantage of these plug-ins inside the script context. Usually this is done by constructing a object dynamically inside the script from the exposed plug-in script class which we can then make use of. Each plug-in has the possibility to implement its own custom User Interface that can be opened from BrainStim, normally this User Interface offers a user friendly way for accessing and testing the plug-ins functionality. For a c++ programmer it's not difficult to create a new custom BrainStim plug-in to extend the program (if you are interested in this please contact us at sven dot gijsen at maastrichtuniversity dot nl).
Important: The internal plug-in object, used by the plug-ins User Interface to show its functionality, is in no way connected to the script or any script object created from this plug-ins class! This is because that internal plug-in is only used for testing purpose and easy access it's features but not for a global configuration. Objects that are dynamically created inside the script context from the plug-ins script class are new instances and in no way connected to the plug-ins UI.
BrainStim has totally no knowledge of the internal plug-ins implementation and does not define what or how they should do things, making this plug-in framework very flexible for developers. A BrainStim installation contains some standard plug-ins that are automatically installed together with BrainStim. These can be installed as a separate plug-in file or build inside the BrainStim executable (these plug-ins are called static). Plug-ins are grouped in either Device or Extension plug-ins. As we already know by now a plug-in can define a custom (script) class from which we can construct new script plug-in objects. Let's first take a look at a plug-ins implemented UI and some of its features:
- Start BrainStim.
- Make sure that the BrainStim plug-in named KeyBoardPlugin is available by opening the menu Help -> About BrainStim command. Inside the plug-ins list box you should see this plug-in listed. It's marked as Static which means that this plug-in is build into the BrainStim executable and therefore is always available for usage. Dynamic plug-ins are automatically loaded and embedded at the startup of BrainStim.
- Open the KeyBoardPlugin User Interface by opening the menu Plugins -> Device Plugins -> KeyBoardDevice Plugin.
- This plug-in is capable of capturing key presses/releases, you can try this by clicking on the Start Capture Thread button and press some keys. Play around with the plug-ins dialog features to get an understanding of what the plug-in can do.
- Click on the Stop Capture Thread button and Close the plug-ins UI dialog.
We can also construct a new plug-in object from this plug-ins script class, lets try this:
- Open the file BrainStimPluginScriptBindings.qs found in the directory BrainStim\examples\GettingStartedGuide\BasicScripting\.
- Examine the script quickly and then execute the QtScript code.
- Repeat pressing a keyboard key (i.e. key '4') until the script finishes.
We saw that the key codes (a unique number for each key) of the captured key presses where logged to the Output Log Pane and after having pressed 4 times the script automatically ended. The line var KeyBoardCaptureObj = new KeyBoardCapture(); constructs a new object from the class defined by the KeyBoardCapture plug-in. This object is then used by the script. We now need to know what this plug-in object can do:
- Open the Help Contents by pressing the 'F1' key.
- Enter 'KeyBoardCapture' in the help search field and press enter. A help document with the name KeyBoard Device script class is found let's open that by clicking on the link.
This help document is a script class reference, that shows all the available signals/slots and member function that can be used inside the script context for this plug-ins script class.
The Experiment Manager plug-in
We saw that BrainStim is a rich multiple document editor with an internal script engine that can execute scripts and that it can be extended by the use of custom plug-ins. However, the main goal during development was to create a platform for editing and executing behavioral experiments for supporting cognitive research. Creating behavioral experiments can be done by using solely the BrainStim script engine but this is pretty difficult for an average user. Therefore a BrainStim plug-in called the Experiment Manager was created to support more functionality for creating and running behavioral experiments. Important! It's advised to read the document Creating Experiments with the Experiment Manager to get started!
How to proceed...
Due to the huge capabilities of BrainStim this Getting Started guide might be
somehow difficult to fully understand immediately, this is not a
real problem. It's important to gain a general idea of how BrainStim works and what it's main capabilities are. If you then want to give it a try you could then start by
changing an example from this Getting Started Guide or proceed
with one of the
Advanced
Examples found in the <BrainStim Installation Directory>\examples\BrainStim\Advanced\ directory.
Off course you can always contact us at sven dot gijsen at
maastrichtuniversity dot nl for feedback and questions!