Experiment Manager Plug-in (v1.0)
Document version: 1.0
Author(s): Sven Gijsen
Date: July 2015
Introduction
The Experiment Manager Plug-in implements a Experiment Engine that you can use to present various kinds of stimuli. It can load an Experiment file (*.exml) that defines the configuration for the experiment; see the EXML-File definition. The Experiment Manager can be created and used by a script or can be used directly by executing an Experiment file by BrainStim. Please read the Creating Experiments with the Experiment Manager document for a beginners Getting Started Guide.
Directories
The Experiment manager makes use of the Outputs sub-directory inside the Main User Directory of BrainStim for storing log and output files.
EXML-File
The experiment structure file is an XML file type that can be loaded by the Experiment Manger for its configuration. You can edit this type of file directly in BrainStim using its User Interface or use a text/code editor.
The file can be used for configuring:
- Experiment Structure, this structure represent a sequential timing scheme that is used when running the experiment. Depending on the current Experiment Structure one or more tasks can be executed. The Experiment Structure does not run automatically by using a sort of internal timer but instead can receive trigger signals to advance to another state.
- Objects Declarations, these declared objects are automatically constructed and destructed at the beginning and end of the experiment and can be used during the experiment to perform certain tasks.
- Object Connections, these connections can link two objects to each other. This for example can cause one objects action to lead automatically to another objects action to occur.
- Object Initializations/Finalizations, these initializations/finalizations define object action that should be performed at the beginning or end of an Experiment.
- Object Parameters, depending on the current Experiment Structure these object parameters are automatically changed and used when the Experiment is running.
Experiment Structure
as explained above this structure represent a sequential timing scheme that is used when running the experiment. The Experiment Structures scheme is defined by one or more Block and optionally Loop element(s). These defined Block and optionally Loop element(s) from a Experiment Structure file are automatically visualized in BrainStim when such an file is opened.
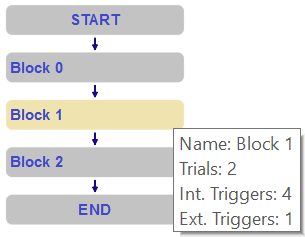
Experiment Structure Block
This element contains the following child elements that can be configured:
- Block Name: This is the name for the Block
- Block Number: This determines the order of the Block inside the Experiment Structure. The Block with the lowest Block Number (starting from 0) is executed first and thereafter subsequently the next Block Number is executed. Later on we'll see that a Loop can be an exception to this rule, but in general they are automatically executed sequentially and when there are no more Blocks to be executed (with a higher Block Number) then the experiment automatically finishes. The Block Number can not be a negative number and must be unique!
- Block Trials: This determines the number of trials for this block. Each Block Trial is executed once for each Block. At each beginning of a new Block Trial the optionally defined Object Actions are automatically fetched and used.
- Internal Triggers: This determines how many Internal Triggers one Block Trial takes.
- External Triggers: This determines how many
External Triggers one Internal Trigger
takes.
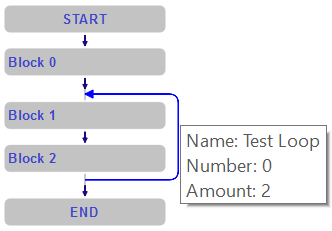
Experiment Structure Loop
Above here we read that Blocks generally are automatically sequentially executed by using their Block Number setting and when there are no more Blocks left the experiment automatically ends. An exception to this rule is a Loop. This Loop is an additional Block link that connects the end (after execution) of another Block to the beginning (before execution) of an Block. This Loop element contains the following child elements that can be configured:
- Loop Name: This is the name for the Loop
- Loop Number: This determines the order of the Loop executions for the optional available defined Loops for a certain Block (after execution) inside the Experiment Structure. The Loop with the lowest Loop Number (starting from 0) is executed first and thereafter subsequently the next Loop Number is executed. The Loop Number can not be a negative number and must be unique for a Block!
- Loop Source: This is the Block where after (after execution) this Loop is linked from.
- Loop Target: This is the Block to which this Loop links to (before execution).
- Loops: This is the amount executions of the loop after the Loop Source is executed. For each time the Loop is used this is incremented till the Loops setting, after that the next Loop (if defined) or next Block (if defined) is automatically executed.
- Important:
Remember that Loops are executed
after the execution of a block.
Bearing this in mind try to understand why Block 1 in the below
Experiment Structure scheme is executed
3 times in total with a
Loops (Amount) setting of 2 for the loop.
Experiment Structure External Triggering
After the experiment has been started a internal Experiment Engine loads the Experiment Structure and waits for the first External Trigger to be incremented. This is done by invoking a function called incrementExternalTrigger(). After this each invocation of that slot causes the External Trigger for the current BlockTrial to automatically increment. Depending on how long the time is between two subsequent invocations the current Experiment Structure changes as shown above here. The internal Experiment Engine has no knowledge of how long the time is between two subsequent invocations and is therefore totally independent of this. Each time a new Block Trial is started the Object Parameters are again fetched and used, if they are not redefined then the last used values kept (buffered).
Experiment Engine
The internal Experiment Engine is currently implemented by two different script classes, and depending on your experimental needs you can choose between these:
- RetinotopyMapper class: Allows for an very fast and accurate timed(frame rate) visual presentation of various stimuli and is mainly used for creating Retinotopic Mapping stimuli experiments, read this document for more information about this topic.
- QML2Viewer class: Allows for an fast presentation of all kind of stimuli (like graphics, movies, audio, 3D content...) and can make use of almost any device or feature available by default or through one of the available plugin(s).
Experiment States
The ExperimentManager can go through different states when loading or executing an Experiment, these states are defined here. We can catch these state changes in our script and make use of that. Furthermore after successfully loading/preparing an experiment and executing it (by using the BrainStim User Interface or by calling the function ExperimentManager::runExperiment() it gives the control back to the user one more time where it can wait, abort or "really" start the Experiment were after the Experiment Engine is ready to receive it's first External Trigger.
When the User gets a Final control, depending on the internal Experiment Engine implementation the screen changes to something like:
|
Experiment ready, press 'Alt' to proceed or CTRL + 'a' to abort the experiment
|
At this moment you can press the Alt key to unlock the experiment were after the Experiment Engine is ready to receive it's first External Trigger. You can also choose to press the CTRL + a (abort) key combination to abort. You can also choose to do this while the experiment is running. After you unlocked the Experiment using the Alt key the screen changes to:
|
Experiment ready, waiting for a trigger to start...
|
If the Experiment Engine now receives it's first External Trigger then that timestamp is the exact "real" start of the experiment and because the first Trial for the first Block is initialized at that moment the newly configured Object Parameters are immediately processed.
Experiment Manager Script Classes
There are a number of script classes made available for us by the ExperimentManager plugin that support Experimental Designs.
Further reading
To start learning how to create Experiment using the Experiment Manager plugin you should definitely read this Creating Experiments with the Experiment Manager document. After that you should try out some (Advanced) Examples and try to tweak them.